

Browser extensions like uBlock Origin are great, but they only protect the device they’re installed on. The moment your phone leaves Wi-Fi, or a smart TV app starts throwing ads at you, browser-based blocking stops helping. If you want every device on your network protected — phones, tablets, smart TVs, IoT gadgets — you need to block ads at the network level, before they even reach a device.
That’s exactly what I set up in my homelab using AdGuard Home, and it’s been one of the highest-impact, lowest-maintenance projects I’ve run.
What AdGuard Home Actually Does
AdGuard Home works as a DNS server. Instead of your devices resolving domain names through your ISP’s DNS (or Google’s 8.8.8.8), they resolve through AdGuard Home first. It checks each request against blocklists of known ad, tracker, and malware domains — if a match is found, the request is blocked before any connection is even made. No ad ever loads, because the domain serving it never resolves.
The result: no ads in YouTube’s home feed thumbnails, no tracking pixels loading in random apps, no ad networks phoning home from your smart TV — all without touching a single device’s settings individually.
My Setup
I run AdGuard Home in a dedicated DietPi VM (just called dns), one of three VMs I manage on a Hyper-V host (an old HP i5-6500T repurposed as a home server running Windows Server 2019). Keeping it isolated in its own lightweight VM — separate from my Docker/Portainer VM and my OMV storage VM — means it has a clean, minimal footprint and one job: resolve DNS for the whole network.
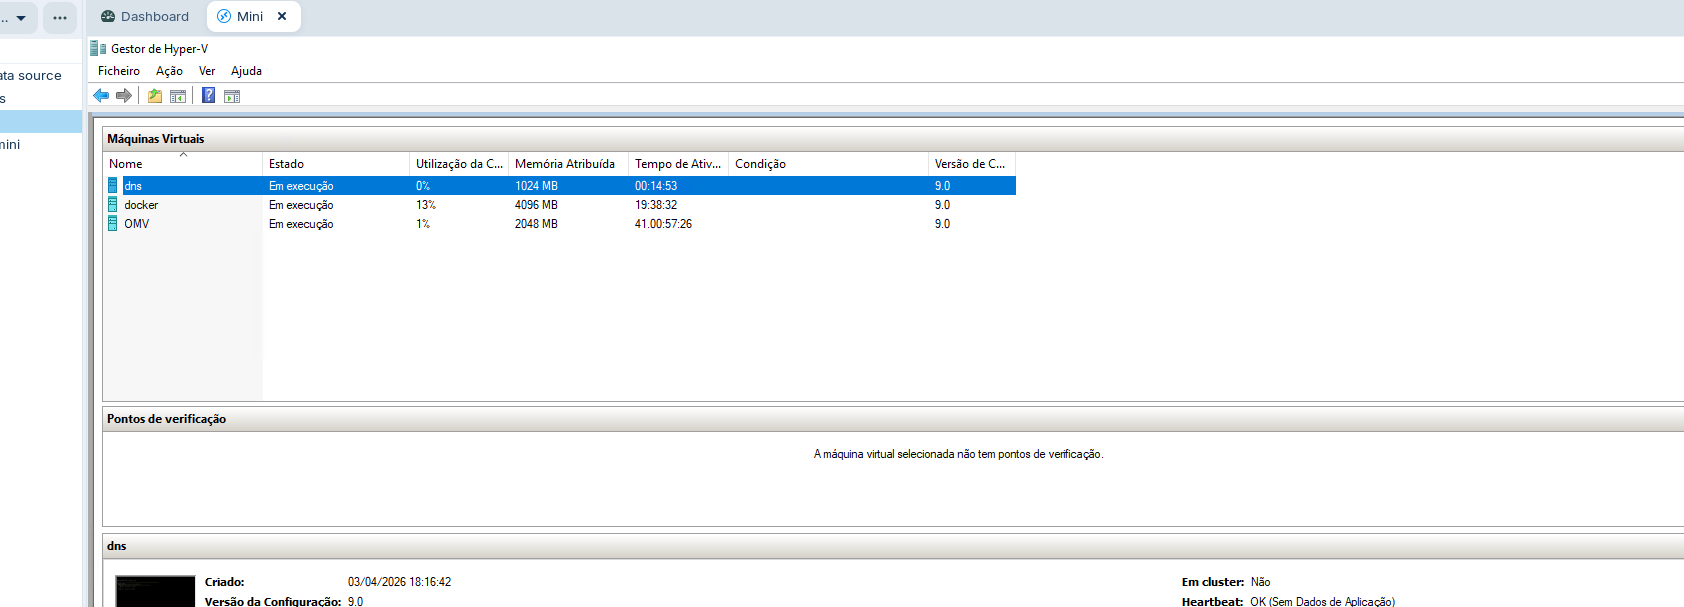
DietPi is a great fit here. It’s a minimal Debian-based image built for exactly this kind of single-purpose service — low RAM footprint, fast boot, no bloat. The dns VM here is running on just 1024 MB of RAM at 0% CPU most of the time — this is not a resource-hungry service.
The core steps
- Install DietPi on the VM and update the base system
- Run
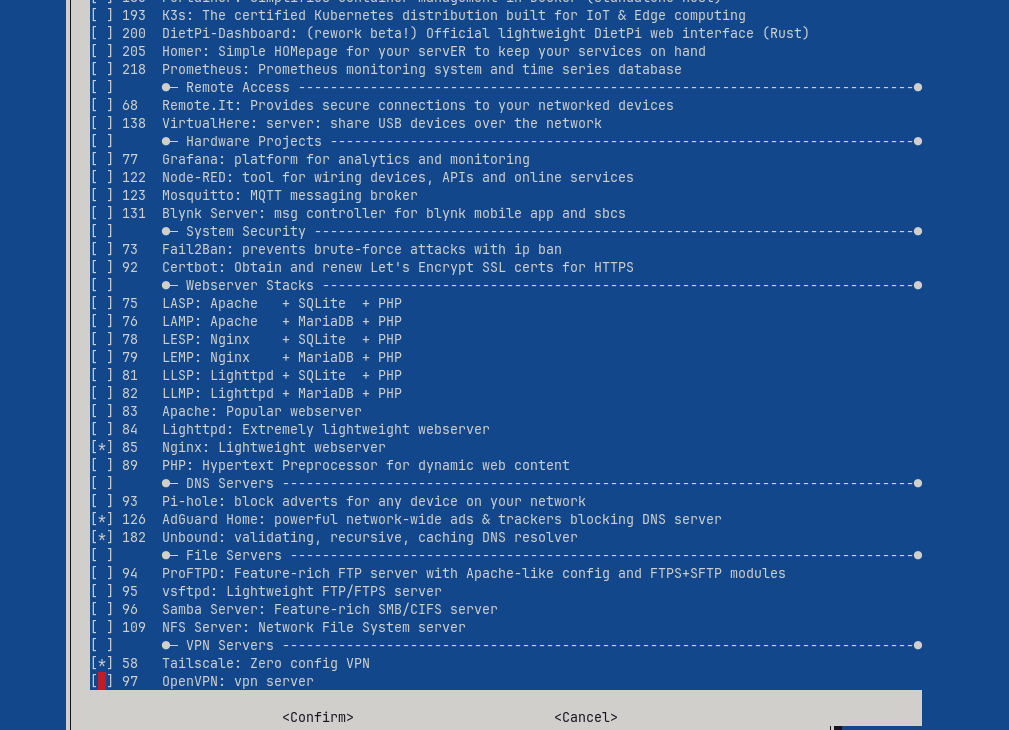
dietpi-softwareand select AdGuard Home from the DNS Servers section — DietPi handles the install for you
- Set a static IP for the VM — this is critical, since every device on your network will point to this address for DNS
- Configure your router to hand out that VM’s IP as the DNS server via DHCP, so every device gets protected automatically without manual configuration
- Add blocklists — AdGuard Home ships with solid defaults, but I added a few extra lists targeting tracking and telemetry domains specifically
One extra step I’d recommend: I also installed Unbound alongside AdGuard Home, on the same DietPi menu. Unbound is a validating, recursive DNS resolver — instead of AdGuard Home forwarding blocked-through queries to a third-party DNS provider (Google, Cloudflare, etc.), Unbound resolves them directly from the root DNS servers. It’s a small extra step that keeps your DNS resolution independent of any single provider.
Why the Router-Level DHCP Change Matters
The single biggest lesson from setting this up: don’t just point individual devices at AdGuard Home’s IP. Change the DNS server at the router/DHCP level instead. This way, every new device that joins your network — a guest’s phone, a new smart plug, whatever — gets ad blocking automatically, with zero manual setup per device.
What I Noticed After a Few Weeks
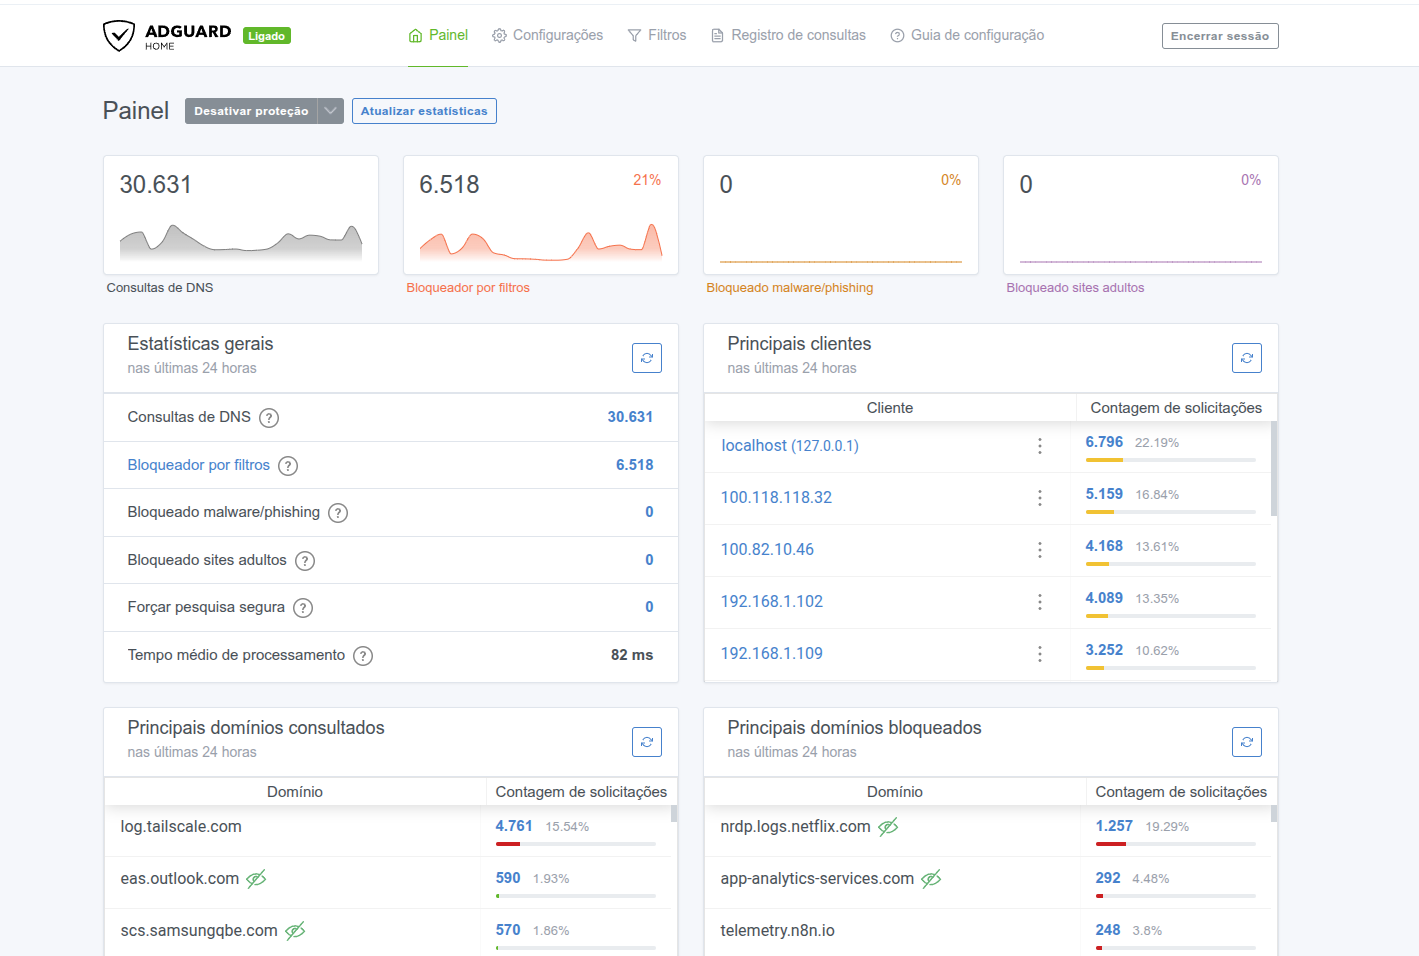
The dashboard tells the real story better than I can: 30,631 DNS queries in the last 24 hours, with 21% blocked by filters. Zero malware/phishing and zero adult content hits — which just means the household isn’t wandering into sketchy corners of the internet, not that those lists aren’t doing their job elsewhere.
A few other things I noticed:
- Web browsing feels noticeably faster — fewer requests means fewer round trips, especially on ad-heavy news sites
- Smart TV apps got dramatically less annoying — Netflix’s
nrdp.logs.netflix.comalone accounted for nearly 20% of everything blocked in one 24-hour window, and variousapp-analytics-services.comtype domains showed up constantly across devices - The “Top Clients” view is genuinely useful for visibility — you can see exactly which device on your network is generating the most DNS traffic. One of mine was a Tailscale-connected client logging heavily to
log.tailscale.com, which was a good reminder of how much background traffic modern apps generate even when you’re not actively using them
The one that actually surprised me: I found telemetry.n8n.io sitting in my top blocked domains, generating hundreds of requests. Turns out my self-hosted n8n instance (used for automating some blog workflows) phones home with usage telemetry by default. Nothing malicious — just anonymized product analytics — but it’s a good example of why network-wide visibility matters: I never would have noticed this from inside n8n’s own settings. (If you run n8n yourself, you can disable this directly with the N8N_DIAGNOSTICS_ENABLED=false environment variable — no need to rely on DNS blocking for your own self-hosted tools.)
A Few Practical Notes
- Have a fallback plan. If your AdGuard Home VM goes down, your whole network loses DNS resolution — nothing loads. Since it’s just one VM among three on my Hyper-V host, a host reboot or VM crash means everyone in the house notices immediately. Worth keeping the VM lightweight and stable, and knowing how to quickly point the router back to a public DNS if needed.
- Some blocklists are overly aggressive and break legitimate sites. AdGuard Home makes it easy to whitelist specific domains when this happens — expect to do this occasionally in the first few weeks.
- DNS-over-HTTPS on some apps can bypass it. A handful of apps and browsers (Firefox, some IoT devices) ship with hardcoded DNS-over-HTTPS servers that skip your local DNS entirely. Worth knowing this isn’t a 100% guarantee, just a very strong default.
Was It Worth It?
For the time it took — under an hour, most of it spent on the DietPi install and router config — yes, easily. It’s the kind of homelab project with a huge quality-of-life return relative to effort, and once it’s running, it needs almost no maintenance beyond the occasional blocklist update.
If you’re running a homelab already and haven’t set up network-wide DNS ad blocking yet, it’s one of the better places to start.